How to use risk workflows: command line interface setup#
The steps below demonstrate how to download the files from one of our workflow repositories, install a suitable Python software environment and start a Jupyter interface to interact with the workflow notebooks. To follow the steps, access to a command line interface (CLI, also known as a terminal or console) on the computer you are working on is required. Your choice of command line will depend on your operating system (e.g., Windows, MacOS or Linux). Please consult the installation instructions linked below for options that suit your setup.
Note
Alternative applications with a graphical user interface are available for some of the steps taken on the command line below.
GitHub Desktop: manage git repositories locally and in your GitHub account.
Anaconda Navigator (may require a license): Python environment manager and launcher.
JupyterLab Desktop: JupyterLab launcher and manager.
See the documentation provided with these tools for up-to-date information on their use.
Download a workflow repository#
We recommend working with git on the command line as it allows not just for conveniently downloadingour workflows but updating and contributing to to them as well.
If you have a few moments, maybe you can be convinced to use git. If you have never used git or don’t have the time for it now, head to the other tab in this section for instructions on how to download the workflows via the GitHub website.
You will need to have git installed to follow the steps below.
Here we show how to download the DROUGHT workflow repository as an example, but you can follow the same steps for any other workflow repository if you replace the hazard name (e.g. FLOODS instead of DROUGHTS).
Open a terminal
Clone the repository with
git clone https://github.com/CLIMAAX/DROUGHTS.git
or (alternatively) use ssh if you have access configured for your GitHub account:
git clone git@github.com:CLIMAAX/DROUGHTS.git
Move into the cloned directory
cd DROUGHTS
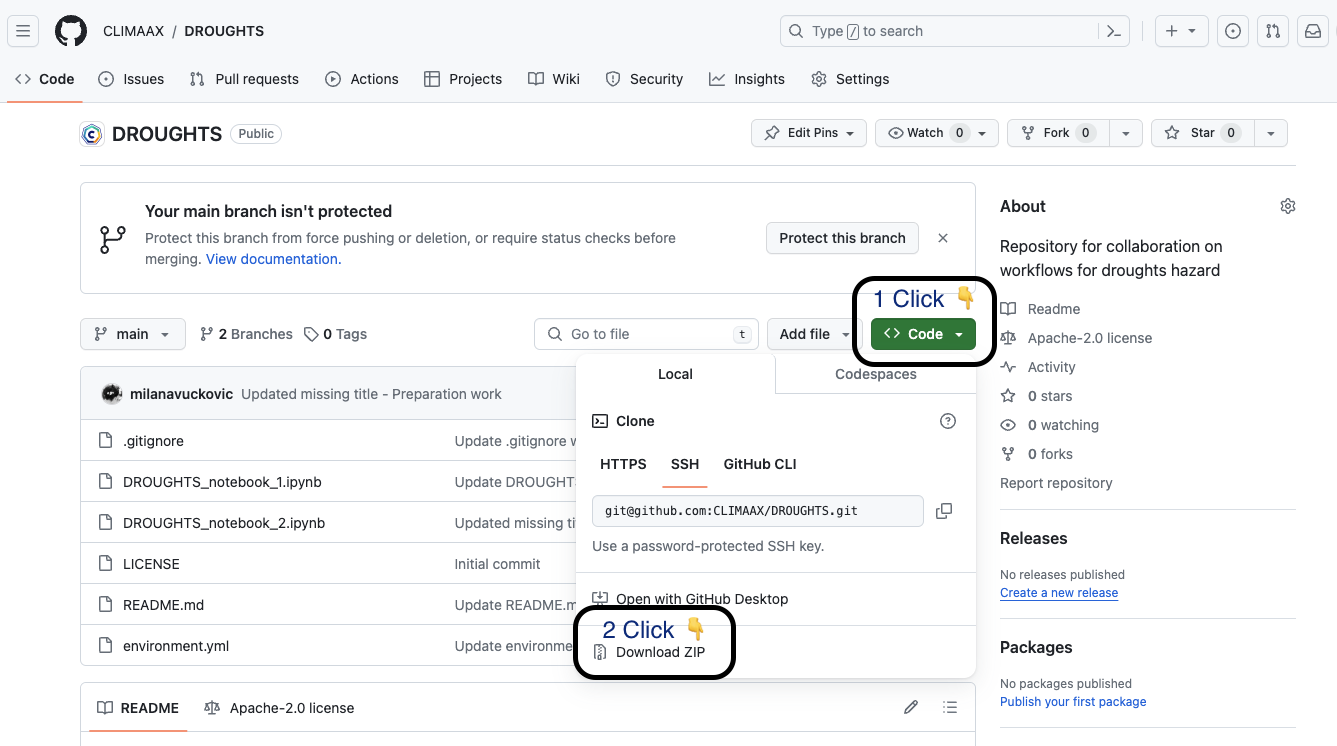
Go to the CLIMAAX GitHub organization and pick the workflow repository for the hazard you want to download, e.g. DROUGHTS.
First click on the <> Code button and then Download ZIP file.

Unzip the file using your favourite tools
Open a terminal inside the unzipped folder
Set up the Python environment#
Every workflow repository contains an environment.yml file for the conda package manager in which all software required to run the workflows in the repository is listed.
In the terminal, check your conda install with
conda --version
If you find that you don’t have conda available, install it from here.
Create a conda environment from the
environment.ymlfile:conda env create -f environment.yml
This creates an new environment called climaax_droughts. The name is defined in the environment file and depends on the hazard. Please check the console output for the exact name of your environment and adapt the name in the next steps if necessary.
To activate the created environment, run
conda activate climaax_droughts
The input line on your terminal should now begin with
(climaax_droughts), indicating that the environment is active.
We also provide a general environment configuration in which all CLIMAAX workflows can run in our workflow template repository.
Start Jupyter and run a workflow notebook#
The environment.yml files from our workflow repositories contain both the JupyterLab and Jupyter Notebook interfaces.
With the conda environment from the previous step activated (see above), launch your preferred Jupyter interface in the conda environment:
jupyter lab
or (alternatively)
jupyter notebook
The interface is served in the browser, which should open automatically. Otherwise use the link printed to the console to open. The interface will present the contents of the folder from which Jupyter was launched. Workflow notebooks can be started there and edited and run interactively in the browser.
